# Rob McCool 씨의 NCSA 서버 설정 파일에 기초한 것임. # # 이 파일은 아파치(Apache) 서버 주 설정 파일이다. 이 파일에 들어있는 # 설정 지시자(directive)를 통해 서버의 작동 방식을 지시한다. # 각 지시자에 대한 자세한 정보를 원하면 http://www.apache.org/docs를 # 참고하라. # # 정확한 이해 없이 대충 읽어나가는 일이 없도록 하자. 여기에 적은 내용을 # 그대로 여러분의 상황에 적용시키려 하지 말라. 다음 내용은 실제 지시 # 내용을 위한 힌트라고 생각하자. 내용에 대하여 의문이 있을 때에는 # 온라인 문서를 참조하라. 이 사실에 대하여 지금 여러분에게 충분히 # 경고해두었음을 밝히는 바이다. # # 아파치 서버는 이 파일을 읽고 난 후, /home/httpd/conf/srm.conf 파일을 # 처리하고 그 다음 /home/httpd/conf/access.conf 파일을 읽는다. # 지금 현재 이 설정 파일에서 ResourceConfig, AccessConfig 지시자를 사용하여 # 설정 파일 이름을 바꾸면, 변경된 이름의 설정 파일을 읽는다. # (여기서 /home/httpd 부분은 아파치 서버의 기본 디렉토리로 대체하여 # 생각하면 된다. 예를 들어 여러분이 직접 아파치를 컴파일하여 설치하는 # 경우에는 일반적으로 /usr/local/apache 가 된다.) # # 지시자는 3 개의 기본적인 섹션으로 묶여 있다: # 1. 아파치 서버 프로세스의 전반적인 작동을 제어하는 지시자 # ('global environment, 전체 환경') # 2. 가상 호스트에 의해 처리되지 않는 요청을 모두 처리하는 주 서버 또는 # 기본 서버의 작동을 제어하는 지시자. # 이 지시자 내용은 모든 가상 호스트의 기본값이기도 하다. # 3. 다른 IP 주소 또는 다른 호스트 이름에 대한 요청을 처리할 가상 # 호스트 설정 # # 설정 파일과 로그 파일 이름 : 만약 파일 이름이 "/"로 (또는 Win32 버전의 # 경우 "드라이브명:/" ) 시작하면 주어진 파일 이름 그대로를 사용한다. # 그러나 "/" 로 시작하지 않을 때에는 ServerRoot 의 값이 그 앞에 추가된다. # 따라서 "logs/foo.log"는 ServerRoot 값 (예를 들어 "/usr/local/apache")이 # 앞에 추가되어 서버는 최종적으로 "/usr/local/apache/logs/foo.log"를 # 사용한다. #
### 섹션 1 : 전체 환경 (Global Environment) # # 이 섹션에 적힌 지시자는 예를 들어 아파치 서버가 처리할 수 있는 동시 # 요청의 갯수라든지 다른 설정 파일의 이름 등 아파치 서버의 전반적인 # 작동에 영향을 미친다. #
# # 서버 유형(ServerType)은 inetd 또는 standalone 둘 중 하나이다. # inetd 방식은 유닉스 플랫폼에서만 지원된다. # ServerType standalone
# # 서버 루트(ServerRoot) : 서버의 설정 파일, 에러 파일, 로그 파일이 # 기록되는 디렉토리의 최상위 경로명. # # 주의! 만약 서버 루트를 NFS (또는 기타 네트웍 파일 시스템) 마운트된 # 곳에 두고자 한다면 LockFile 문서를 꼭 읽어보아야 한다. # (); # 문서를 읽고 나면 앞으로 닥칠 지 모르는 몇 가지 문제점을 피할 수 있다. # # 디렉토리 경로 뒤에 슬래쉬(/) 문자를 쓰지 않는다!!! # ServerRoot "/etc/httpd"
# # LockFile 지시자는 아파치를 USE_FCNTL_SERIALIZED_ACCEPT 또는 # USE_FLOCK_SERIALIZED_ACCEPT 옵션을 주고 컴파일한 경우, 잠금 파일을 # 경로를 지정할 때 사용한다. 이 지시자 값은 일반적으로 기본값이 # 되도록 놔둔다. 이 값을 바꾸는 경우는 로그 디렉토리가 NFS 마운트된 # 곳에 있는 경우로서 잠금 파일은 항상 네트웍 파일 시스템이 아닌 # 로컬 디스크에 저장되어야 하기 때문이다. 주 서버 프로세서의 PID 값이 # 자동으로 파일 이름 뒤에 붙는다. # LockFile logs/accept.lock
# # PidFile: 서버가 시동될 때 자신의 프로세스 고유 번호를 기록할 파일 # PidFile /var/run/httpd.pid
# # ScoreBoardFile: 내부 서버 프로세스 정보를 기록하는데 사용하는 파일. # 모든 아키텍쳐에서 꼭 필요한 것은 아니다. 하지만 필요하다고 생각하는 # 경우에는 하나의 아파치 프로그램을 두 번 이상 실행시키는 경우 값이 # 중복되지 않도록 해주는 것만 잊지 않으면 된다. # ScoreBoardFile logs/apache_runtime_status
# # 표준 설정에서 서버는 httpd.conf, src.conf, access.conf 파일을 # 차례대로 읽어나간다. 나중에 있는 2 개의 파일은 현재 아무 내용도 # 없는 빈 상태로 배포되고 있다. 왜냐하면 모든 지시자를 그냥 하나의 # 파일에 적는 것이 더욱 명료하기 때문이다. 주석으로 처리되어 있는 # 값은 기본값이다. 서버가 이 파일 내용을 무시하도록 하기 위해서는 # "/dev/null" (유닉스의 경우) 또는 "nul" (Win32) 값을 지정한다. # #ResourceConfig conf/srm.conf #AccessConfig conf/access.conf
# # Timeout: 받기/보내기 타임 아웃 시간 # Timeout 300
# # KeepAlive: 지속성(persistent) 접속을 허가할 것인가 말 것인가? # (한 번의 접속에서 여러 개의 요청을 처리할 것인가 여부) # 허가하지 않기 위해서는 "Off"로 설정한다. # 허가하지 않는 것과 허가하는 것과의 효율 차이는 매우 크다. # KeepAlive On
# # MaxKeepAliveRequests: 지속성 접속 기간 동안 처리할 수 있는 최대 요청 갯수 # 0 을 넣으면 무한대이다. 높은 성능을 내기 위해서 높은 값을 추천한다. # MaxKeepAliveRequests 100
# # KeepAliveTimeout: 같은 접속 상태에서 같은 클라이언트의 요청이 타임 아웃되는 # 시간 (초 단위) # KeepAliveTimeout 15
# # 서버 풀(Server-pool) 크기 조정. 몇 개의 프로세스가 필요한지 여러분에게 # 추측하도록 하기 보다는 현재의 부하 상태에 자동으로 적응하도록 되어 있다. # 아파치 서버는 현재의 부하 상태와 순간적으로 급격히 상승하는 경우 값 # (예를 들어 하나의 네스케이프 브라우져에서 동시에 여러 개의 요청이 # 들어올 수 있다)을 처리할 수 있는 충분한 갯수의 서버 프로세스를 유지하려 # 노력한다. # # 아파치 서버는 주기적으로 몇 개의 서버가 요청 대기 상태인지 점검한다. # 만약 MinSpareServers 보다 적다면 여유 서버 프로세스를 생성한다. # 만약 MaxSpareServers 보다 많으면 불필요한 여유 프로세스를 제거한다. # 이 곳에 제시된 기본값은 거의 대부분의 사이트에 적합하다. # MinSpareServers 8 MaxSpareServers 20
# # 처음 시동할 때 만들 서버의 갯수 -- 합리적인 근사치여야 한다. # StartServers 10
# # 서버 프로세스의 최대값, 즉 동시에 접속할 수 있는 클라이언트 갯수를 # 제한하는 값이다. -- 만약 이 값에 도달한다면 클라이언트의 요청은 # 봉쇄될 것이다. 따라서 이 값이 너무 낮아서는 안된다. 이 값은 # 아파치 서버가 너무 많은 자원을 소비하여 전체 시스템을 먹통이 되도록 # 하는 것을 방지하기 위해 사용될 뿐이다. # MaxClients 250
# # MaxRequestsPerChild: 각 자식 프로세스가 죽기 전까지 처리할 수 있는 # 요청 갯수. 한 프로세스가 너무 오랫 동안 사용되면 메모리 누출이나 # 자원 누출(아파치 때문에 또는 잘못된 라이브러리 때문에)이 발생할 수 # 있으므로 자식 프로세스는 자동으로 죽는다. 대부분의 시스템에서는 # 필요치 않으나 솔라리스에서와 같이 라이브러리에서의 자원 누출 현상을 # 막기 위해 필요하다. # MaxRequestsPerChild 100
# # Listen: 아파치를 기본값 이외에도 특정 IP 주소 또는 포트에 연결하도록 # 해준다. 지시자도 참고하라. # #Listen 3000 #Listen 12.34.56.78:80
# # BindAddress: 이 옵션을 사용하여 가상 호스트를 지원할 수 있다. # 이 지시자를 이용하여 서버가 귀기울일 IP 주소를 지시할 수 있다. # "*", IP 주소, 또는 완전한 인터넷 도메인 이름을 사용할 수 있다. # , Listen 지시자도 참고하라. # BindAddress *
# # 동적 공유 객체(Dynamic Shared Object, DSO) 지원 # # DSO 방식으로 만들어진 모듈의 기능을 사용하기 위해서는 그 기능에 관련된 # 지시자를 사용하기에 앞서 알맞게 `LoadModule' 지시자로 모듈을 # 지시해주어야 한다. DSO 작동방식에 대하여 자세히 알고 싶은 사람은 # 아파치 1.3 배포 파일의 README.DSO 를 읽어보라. 여러분이 갖고 있는 # httpd 바이너리에 내장된(정적으로 링크되어 항상 사용가능한) 모듈 목록을 # 알고 싶을 때에는 `httpd -l' 명령을 실행한다. # # 주의: 모듈을 적재하는 순서는 매우 중요하다. 전문가의 조언 없이 # 아무렇게나 순서를 바꾸지 말라. # # 예: # LoadModule foo_module libexec/mod_foo.so #LoadModule mmap_static_module modules/mod_mmap_static.so LoadModule env_module modules/mod_env.so LoadModule config_log_module modules/mod_log_config.so LoadModule agent_log_module modules/mod_log_agent.so LoadModule referer_log_module modules/mod_log_referer.so #LoadModule mime_magic_module modules/mod_mime_magic.so LoadModule mime_module modules/mod_mime.so LoadModule negotiation_module modules/mod_negotiation.so LoadModule status_module modules/mod_status.so LoadModule info_module modules/mod_info.so LoadModule includes_module modules/mod_include.so LoadModule autoindex_module modules/mod_autoindex.so LoadModule dir_module modules/mod_dir.so LoadModule cgi_module modules/mod_cgi.so LoadModule asis_module modules/mod_asis.so LoadModule imap_module modules/mod_imap.so LoadModule action_module modules/mod_actions.so #LoadModule speling_module modules/mod_speling.so LoadModule userdir_module modules/mod_userdir.so LoadModule proxy_module modules/libproxy.so LoadModule alias_module modules/mod_alias.so LoadModule rewrite_module modules/mod_rewrite.so LoadModule access_module modules/mod_access.so LoadModule auth_module modules/mod_auth.so LoadModule anon_auth_module modules/mod_auth_anon.so #LoadModule dbm_auth_module modules/mod_auth_dbm.so LoadModule db_auth_module modules/mod_auth_db.so LoadModule digest_module modules/mod_digest.so #LoadModule cern_meta_module modules/mod_cern_meta.so LoadModule expires_module modules/mod_expires.so LoadModule headers_module modules/mod_headers.so LoadModule usertrack_module modules/mod_usertrack.so #LoadModule example_module modules/mod_example.so #LoadModule unique_id_module modules/mod_unique_id.so LoadModule setenvif_module modules/mod_setenvif.so
# # ExtendedStatus 지시자는 "server-status" 처리기가 호출되었을 때 # 아파치가 "매우 자세한" 상태 정보를 생성시킬 것인지 # (ExtendedStatus On) 아니면 매우 기본적인 정보만 생성시킬 것인지를 # (ExtendedStatus Off) 제어한다. 기본값은 Off 이다. # ExtendedStatus On
### 섹션 2: '주(Main)' 서버 설정 # # 이 섹션에 있는 지시자는 정의에 의해 처리되지 않는 # 모든 요청에 응답할 '주' 서버가 사용할 값을 정한다. # 이 값들은 또한 이 파일 뒷 부분에서 정의할 모든 # 컨테이너의 기본값을 제공하기도 한다. # # 여기 나오는 모든 지시자는 컨테이너 안에서도 사용할 # 수 있으며 그 안에서 사용되면 해당 가상 호스트에 대하여 전체 # 기본값을 무시하고 새롭게 정한 값이 채택된다. #
# # 만약 ServerType ('Global Environment' 섹션에서 설정)이 "inetd"인 # 경우, inetd 설정 내용을 따르기 때문에 다시 몇 가지 지시자는 # 아무런 효력을 발휘하지 않는다. # ServerAdmin 지시자까지 그냥 건너뛴다. #
# # Port: 독립실행형(standalone) 서버가 요청을 기다리는 포트. # 1023 번보다 낮은 번호의 포트에 대해서는 httpd가 처음에는 # root 권한으로 실행되어야 한다. # Port 80
# # httpd가 다른 사용자 또는 그룹 권한으로 실행되게 하려면 우선은 # httpd가 root 사용자 권한으로 실행되고 나서 설정한 다른 사용자 # 권한으로 전환해야 한다. # # User/Group: httpd가 실행된 권한의 사용자/그룹의 이름(또는 #번호). # . SCO (ODT 3)에서는 "User nouser"와 "Group nogroup"을 사용한다. # . UPUX 에서는 nobody로 실행하는 경우 공유 메모리를 사용할 수 # 없을 것이다. 이 때는 www 등의 사용자를 만들고 그 사용자 권한으로 # 실행되도록 한다. # 주의) 몇몇 커널들은 60000 이상의 (unsigned) 그룹 값을 설정하면 # setgid(Group), semctl(IPC_SET) 함수를 거부한다. # 이런 시스템에서는 Group #-1을 사용하지 말라! # User nobody Group nobody
# # ServerAdmin: 서버에 문제가 발생했을 때 메일을 보낼 메일 주소. # 이 주소는 예를 들어 에러 문서와 같이 서버가 생성하는 페이지에 # 나타날 것이다. # ServerAdmin root at ask.co.kr
# # ServerName은 클라이언트 프로그램에게 돌려주는 서버 이름이 다른 경우 # 호스트 이름을 설정할 수 있게 해준다. (예를 들어, 호스트의 실제 이름이 # 아닌 'www'를 사용하도록 하는데 사용할 수 있다.) # # 주의: 호스트 이름을 아무렇게나 만들어선 안된다. 이 이름은 여러분의 # 호스트에 주어진 타당한 DNS 이름이어야 한다. 잘 모르겠으면 네트웍 # 관리자에게 문의하라. # 호스트가 등록된 DNS 이름을 갖고 있지 않는 경우에는 이 곳에 IP 주소를 # 적는다. 어찌 되었든 IP 주소를 사용하여(예를 들어 http://123.45.67.89/) # 접속할 수 있다. 이런 식으로 해서 리다이렉션이 작동하도록 할 수 있다. # ServerName www.ask.co.kr
# # DocumentRoot: 제공할 문서의 상위 디렉토리. # 기본적으로 모든 요청은 이 디렉토리로부터 처리된다. 하지만 # 심볼릭 링크나 앨리어스(alias)를 사용하여 다른 위치를 가리키도록 # 할 수 있다. # DocumentRoot "/home/httpd/html"
# # 아파치가 접근할 수 있는 각 디렉토리에 대하여 어떤 서비스와 기능을 # 허용할 것인지 거부할 것인지 여부를 설정할 수 있다. # 디렉토리에 대한 설정 내용은 그 하부 디렉토리에도 영향을 미친다. # # 우선, "기본값"을 매우 제한적인 상태로 설정한다. #
Options None AllowOverride None
# # 이 곳부터 허용할 특정 기능을 알맞게 설정해나간다는 사실을 주목하자. # 여러분이 기대한 대로 작동하지 않는 것이 있다면 그 기능을 가능 상태로 # 설정해두었는지 점검하기 바란다. #
# # 다음 내용은 여러분이 설정한 DocumentRoot 값으로 변경해서 사용한다. #
# # 다음 값에는 "None", "All", 또는 "Indexes", "Includes", # "FollowSymLinks", "ExecCGI", "MultiViews"의 자유로운 조합이 # 가능하다. # # "MultiViews" 만큼은 "Options All"을 사용한다 할 지라도 명시적으로 # 적어야만 작동한다는 사실을 알아두자. # Options Indexes Includes ExecCGI FollowSymLinks
# # 다음은 각 디렉토리에 위치한 .htaccess 파일에서 어떤 옵션을 # 마음대로 제어할 수 있는지 결정한다. # "All" 또는 "Options", "FileInfo", "AuthConfig", "Limit"의 자유로운 # 결합이 가능하다. # AllowOverride None
# # 서버로부터 자료를 얻어갈 수 있는 위치를 제어한다. # #Order allow,deny #Allow from all Deny from env=go_out
Deny from env=go_out
# # UserDir: ~user 요청을 받았을 때 사용자의 홈 디렉토리 뒤에 추가할 # 디렉토리 이름. # #UserDir public_html
# # UserDir 디렉토리에 대한 접근을 제어한다. 다음은 사용자 홈 페이지에 # 대하여 읽기만 가능하도록 한 예제 설정 내용이다. 참고 자료로 # 사용하기 바란다. # # # AllowOverride FileInfo AuthConfig Limit # Options MultiViews Indexes SymLinksIfOwnerMatch IncludesNoExec # # Order allow,deny # Allow from all # # # Order deny,allow # Deny from all # #
# # DirectoryIndex: 준비된 HTML 디렉토리 인덱스로 사용할 파일이나 # 파일 목록의 이름을 나열한다. 여러 개를 나열할 때는 스페이스로 # 구분한다. # DirectoryIndex index.html index.shtml index.cgi
# # AccessFileName: 각 디렉토리에 대하여 접근 제어 정보 내용을 # 담고 있을 파일 이름 # AccessFileName .htaccess
# # 다음 행은 웹 브라우져가 .htaccess 파일을 접근할 수 없도록 하는 # 설정이다. .htaccess에는 인증 정보가 들어있는 경우가 빈번하므로 # 보안 상 이유로 이 파일에 대한 접근은 불허해야 한다. # 웹 방문객들이 이 파일을 보게 하고 싶으면 다음 행들을 주석 처리하라. # 만약 AccessFileName 설정을 다른 파일명으로 바꾸었다면 알맞게 # .htaccess를 그 이름으로 바꾸어준다. # # #Order allow,deny #Deny from all #
# # CacheNegotiateDocs: 기본적으로 아파치는 내용에 따라 협상된 문서에 # 대해서는 "Pragma: no-cache" 내용을 전송한다. 이 행은 프록시 서버로 # 하여금 문서를 캐쉬하지 않도록 요청한다. 다음 행의 주석을 풀면 # 이 기능을 해제하고 모든 프록시가 문서들을 캐쉬할 수 있도록 한다. # CacheNegotiatedDocs
# # UseCanonicalName: (1.3 버전에 새롭게 등장) 이 설정을 켜두면, # 아파치가 자기 참조 URL(반응이 오고 있는 서버를 다시 가리키는 # URL)을 만들 필요가 있을 때마다 "공식적인" 이름을 만들기 위해 # ServerName과 Port를 사용한다. 그렇지 않으면 아파치는 가능한 한 # 클라이언트가 제공한 호스트이름:포트 값을 사용한다. # 이 설정은 CGI 스크립트의 SERVER_NAME, SERVER_PORT에도 영향을 # 미친다. # UseCanonicalName On
# # TypesConfig 는 mime.types 파일 또는 이에 해당하는 파일을 찾을 # 위치를 결정한다. # TypesConfig /etc/mime.types
# # DefaultType이란 파일 확장자와 같은 것을 통해 MIME 타입을 알 수 없는 # 문서에 대하여 사용할 기본 MIME 타입을 말한다. 여러분의 서버에 주로 # 텍스트나 HTML 문서가 많다면 "text/plain"을 쓰는 것이 좋다. # 대부분이 실행 프로그램이나 이미지 등 바이너리인 경우에는 # 웹 브라우져가 텍스트라고 생각하여 바이너리 파일을 화면에 표시하지 # 않도록 하기 위해 "application/octet-stream"를 적는다. # DefaultType text/plain
# # mod_mime_magic 모듈을 사용하면 파일의 내용을 가지고 파일의 타입에 # 힌트를 얻는다. MIMEMagicFile 지시자를 사용하여 모듈에게 힌트 # 정보가 저장되어 있는 파일을 설정한다. # mod_mime_magic은 기본 서버의 일부가 아니다.(따라서 LoadModule # 설정을 사용하여 모듈을 추가해야 한다.) 또는 서버를 다시 컴파일해서 # mod_mime_magic을 추가해야 한다. 그렇기 때문에 컨테이너에 # 포함되어 있는 것이다. 다음 설정은 모듈이 서버에 포함되어 있을 때에만 # MIMEMagicFile 지시자를 처리하도록 해준다. #
MIMEMagicFile conf/magic
# # HostNameLookups: 클라이언트의 이름 또는 IP 주소만을 기록할 지 여부. # 예를 들어 www.apache.org (on) 또는 204.62.129.132 (off) # 기본값이 off 인 이유는 각 클라이언트 요청이 올 때마다 최소한 1 번 # 이상의 네임 서버 요청이 발생하기 때문이다. 그러나 꼭 필요한 경우에는 # 이 기능을 켜둔다. # HostnameLookups Off
# # ErrorLog: 에러 기록 파일의 위치. # 컨테이너 안에서 ErrorLog 설정을 하지 않으면 # 그 가상 호스트에 관련된 에러 메시지도 역시 이 곳에 기록된다. # 컨테이너 안에서 에러 로그 파일을 정의하면 # 관련된 에러 메시지는 그 파일로 저장된다. # ErrorLog logs/error_log
# # LogLevel: error_log에 기록될 메시지 분량을 제어한다. # debug, info, notice, warn, error, crit, alert, emerg 등의 # 값이 가능하다. # alert, emerg. # LogLevel warn
# # 다음 지시자는 CustomLog 지시자(아래 참고)에서 사용할 몇 가지 # 형식에 대한 별명을 정의한다. # LogFormat "%h %l %u %t \"%r\" %>s %b \"%{Referer}i\" \"%{User-Agent}i\"" combined LogFormat "%h %l %u %t \"%r\" %>s %b" common LogFormat "%{Referer}i -> %U" referer LogFormat "%{User-agent}i" agent
# # 접근 로그 파일의 위치와 형식(공통 로그파일 형식) # 컨테이너 안에서 접근 로그파일 설정을 하지 않으면 # 모든 기록이 이 파일에 남게 된다. 이와 반대로 각 마다 # 접근 로그파일을 정의하면 모든 처리가 바로 그 파일에 기록된다. # #CustomLog logs/access_log common
# # 에이전트 로그파일과 참조자(referer) 로그파일을 갖기 위해서는 # 다음 지시 내용의 주석 처리를 해제하라. # #CustomLog logs/referer_log referer #CustomLog logs/agent_log agent
# # 하나의 로그파일에 접근, 에이전트, 참조자 정보를 다 저장하기 위해서는 # (통합 로그파일 형식) 다음 지시 내용을 사용하라. # #CustomLog logs/access_log combined
# # 부차적으로 서버가 생성하는 페이지(에러 문서, FTP 디렉토리 목록, # mod_status, mod_info 출력 등, 그러나 CGI 생성 문서는 제외)에 # 서버 버전과 가상 호스트 이름을 포함하는 행을 추가하도록 한다. # "Email"로 설정하면 ServerAdmin으로의 mailto: 링크를 포함한다. # On | Off | EMail 중 하나로 설정한다. # ServerSignature EMail
# # Aliases: 필요한 만큼의 별칭을 만들어 사용한다.(제한 없음) # 형식은 다음과 같다. # Alias 가짜이름 실제이름 # # 가짜 이름 뒤에 / 를 포함하면 아파치 서버는 URL에도 / 이 있어야 # 처리함을 잘 알아두자. 따라서 "/icons"는 별칭 처리되지 않고 # "/icons/"만 별칭 처리된다. # Alias /icons/ "/home/httpd/icons/"
# #Options Indexes MultiViews #AllowOverride None #Order allow,deny #Allow from all #
# # ScriptAlias: 서버 스크립트를 포함하는 디렉토리를 제어한다. # ScriptAlias는 근본적으로 Alias와 같으나 가리키고 있는 실제 디렉토리 # 안에 들어있는 문서를 실행 프로그램으로 취급하여 실행한다. # 맨 뒤에 붙는 "/" 에 대한 규칙은 Alias와 마찬가지이다. # #ScriptAlias /cgi-bin/ "/home/httpd/cgi-bin/"
# # "/home/httpd/cgi-bin" 부분은 ScriptAlias로 별칭 처리된 실제 CGI # 디렉토리로 설정해야 한다. #
AllowOverride None Options ExecCGI #Order allow,deny #Allow from all
# # Redirect를 사용하면 서버의 이름공간에 존재했으나 현재에는 존재하지 않는 # 문서에 대하여 클라이언트에게 통보할 수 있도록 해준다. 이렇게 함으로써 # 위치가 변한 새로운 문서를 어디에서 찾을 수 있는지 클라이언트에게 # 알려줄 수 있다. # 형식: Redirect 예전URI 새URI #
# # 서버가 생성하는 디렉토리 목록의 표시 상태를 제어하는 지시자. #
# # FancyIndexing은 예쁜 디렉토리 목록 또는 표준적인 디렉토리 목록 여부를 # 결정한다. # IndexOptions FancyIndexing
# # AddIcon으로 시작하는 지시자는 서버에게 다양한 파일, 파일명 확장자에 # 대하여 어떤 아이콘을 보여 줄 것인지 말해준다. 이 값들은 # FancyIndexing을 사용하는 경우에만 해당된다. # AddIconByEncoding (CMP,/icons/compressed.gif) x-compress x-gzip
# # DefaultIcon이란 명시적인 아이콘을 갖고 있지 않는 파일에 대한 # 기본 아이콘 파일을 설정한다. # DefaultIcon /icons/unknown.gif
# # AddDescription은 서버 자동 생성 인덱스의 파일명 뒤에 간단한 설명을 # 넣을 때 사용한다. FancyIndexing을 사용할 때에만 보인다. # 형식: AddDescription "설명" 화일명 # #AddDescription "GZIP compressed document" .gz #AddDescription "tar archive" .tar #AddDescription "GZIP compressed tar archive" .tgz
# # ReadmeName은 서버가 디렉토리 목록 뒤에 내용을 덧붙여 넣을 README 파일의 # 이름을 설정한다. # # HeaderName은 디렉토리 인덱스 앞에 내용을 덧붙일 파일명을 설정한다. # # 서버는 먼저 name.html을 찾고 그것이 있으면 그 내용을 포함한다. # 만약 없다면 서버는 name.txt 파일을 찾고 평범한 텍스트 내용으로 # 추가한다. # ReadmeName README HeaderName HEADER
# # IndexIgnore는 디렉토리 인덱싱에 있어 목록에서 제외시킬 파일명을 설정한다. # 쉘 스타일의 와일드 카드를 사용할 수 있다. # IndexIgnore .??* *~ *# HEADER* README* RCS CVS *,v *,t
# # AddEncoding은 특정 브라우져(모자익/X 2.1+)로 하여금 자료를 받으면서 # 정보의 압축을 풀 수 있도록 해준다. 주의: 모든 브라우져가 이 기능을 # 지원하는 것은 아니다. 이름이 유사하기는 하지만 다음부터 나오게 될 # Add로 시작하는 지시자들은 FancyIndexing과는 관련이 없다. # AddEncoding x-compress Z AddEncoding x-gzip gz
# # AddLanguage는 문서의 언어를 명시한다. 내용 협상 과정을 통해 브라우져가 # 이해할 수 있는 언어의 문서를 제공하는 것이 가능하다. # 접미어(suffix)는 언어 키워드와 꼭 같은 필요는 없다. 예를 들어 # 폴란드어(Polish)로 된 문서는 네트웍 표준 언어 코드가 pl 이지만 # 펄 스크립트와 확연히 구별하기 위해 "AddLanguage pl .po"라고 사용한다. # AddLanguage ko .ko AddLanguage en .en AddLanguage fr .fr AddLanguage de .de AddLanguage da .da AddLanguage el .el AddLanguage it .it
# # LanguagePriority는 내용 협상 중 동점이 발생하는 경우 언어 우선권을 # 부여한다. 언어의 우선권을 내림차순으로 나열하면 된다. # LanguagePriority ko en fr de
# # AddType를 사용하면 mime.types 파일 수정없이 MIME 설정을 할 수 있고 # 또는 어떤 파일들에 대하여 특정 타입으로 처리하도록 할 수 있다. # # 예를 들어, PHP3 모듈(아파치 배포파일에 포함되어 있지 않다)에 # 대해서는 다음과 같이 사용한다. # AddType application/x-httpd-php3 .php3 AddType application/x-httpd-php3-source .phps
#다음은 PHP/FI (PHP2)를 위한 것입니다. AddType application/x-httpd-php .phtml
# # AddHandler를 사용하면 특정 파일 확장자와 "처리기"를 연결하거나 # 특정 파일 타입에 특정 동작(action)을 연결할 수 있다. # 서버에 내장되어 있거나 또는 Action 명령을 사용하여 추가할 수 # 있다.(아래 참고) # # 서버 측 포함(SSI) 또는 ScriptAlias 처리된 디렉토리 외부에 # 존재하는 CGI 스크립트를 사용하고 싶을 때는 다음 내용의 # 주석을 없앤다. # # CGI 스크립트를 사용하기 위해: # AddHandler cgi-script .cgi
# # 서버 처리 HTML 파일 사용하기 위해: # AddType text/html .shtml AddHandler server-parsed .shtml
# # 아파치의 send-asis HTTP 파일 기능을 사용하기 위해서는 다음 행의 # 주석을 없앤다. # AddHandler send-as-is asis
# # 서버 처리 이미지 맵 파일을 사용하려면... # AddHandler imap-file map
# # Action을 사용하면 매칭되는 파일이 호출될 때마다 그 미디어 타입에 맞는 # 스크립트를 시행시킬 수 있다. 빈번하게 사용되는 CGI 파일 프로세서에 # 대하여 반복적으로 URL을 사용하지 않아도 된다. # Format: Action media/type /cgi-script/location # Format: Action handler-name /cgi-script/location #
# # MetaDir: 아파치 서버가 메타 정보 파일을 찾을 디렉토리 이름. # 이 파일에는 문서를 보낼 때 추가하고자 하는 추가 HTTP 헤더 정보가 # 들어있다. # #MetaDir .web
# # MetaSuffix: 메타 정보를 담고 있는 파일의 접미어를 설정한다. # #MetaSuffix .meta
# # 사용자 정의 에러 반응 메시지 (아파치 스타일) # 다음 3 가지 방법으로 가능하다. # # 1) 보통의 텍스트 #ErrorDocument 500 "The server made a boo boo. # 주목: " 표시는 텍스트임을 알려주는 것으로서 그 자체는 출력되지 않는다. # # 2) 지역적인 방향 전환 #ErrorDocument 404 /missing.html # 지역적 URL인 /missing.html로 방향 전환하기 #ErrorDocument 404 /cgi-bin/missing_handler.pl # 주목: 스크립트나 SSI로 방향 전환시킬 수 있다. # # 3) 외부 방향 전환 #ErrorDocument 402 http://some.other_server.com/subscription_info.html # 주목: 원래 요청과 관련있는 환경 변수의 상당수가 스크립트에 # 전달되지 못한다는 점을 알고 있어야 한다.
# # 다음 지시자는 보통의 HTTP 반응 방식을 수정한다. # 첫번째 것은 네스케이프 2.x 또는 그를 흉내내는 브라우져에 대하여 # KeepAlive 기능을 쓰지 않도록 한다. 이 브라우져들은 KeepAlive 구현에 # 문제점을 갖고 있기 때문이다. # 두번째 것은 HTTP/1.1을 잘못 구현하였고 301 또는 302 (redirect) 반응에 # 대하여 KeepAlive를 제대로 지원하지 못하는 마이크로소프트 인터넷 # 익스플로러 4.0b2를 위한 것이다. # BrowserMatch "Mozilla/2" nokeepalive BrowserMatch "MSIE 4\.0b2;" nokeepalive downgrade-1.0 force-response-1.0
# # 다음은 기본적인 1.1 반응도 제대로 처리하지 못함으로써 HTTP/1.1 스펙을 # 위반하고 있는 브라우져에 대하여 HTTP/1.1 반응을 하지 않도록 한다. # BrowserMatch "RealPlayer 4\.0" force-response-1.0 BrowserMatch "Java/1\.0" force-response-1.0 BrowserMatch "JDK/1\.0" force-response-1.0 BrowserMatch "WebZIP" go_out BrowserMatch "Teleport" go_out BrowserMatch "GetRight" go_out
SetHandler server-status Order deny,allow Deny from all Allow from all
# # http://servername/server-info를 통하여 원격 서버 설정 보고를 허용한다. # (mod_info.c가 적재되어 있어야 한다.) # 여기서 ".your_domain.com" 부분을 허용할 도메인으로 바꿔 사용하라. # # #SetHandler server-info #Order deny,allow #Deny from all #Allow from .your_domain.com #
# # 1.1 버전 이전의 오래 된 버그를 악용하려는 사람들이 있다는 보고를 받았다. # 이 버그는 아파치 일부분으로 제공한 CGI 스크립트와 연관있다. # 이 부분의 주석 처리를 없애면 이 버그를 악용하는 공격이 있을 때 # phf.apache.org 상의 기록 스크립트로 방향 전환시킬 수 있다. # 또는 support/phf_abuse_log.cgi 스크립트를 사용하여 여러분 직접 기록할 # 수도 있다. # # # Deny from all # ErrorDocument 403 http://phf.apache.org/phf_abuse_log.cgi #
Options Includes ExecCGI FollowSymLinks AllowOverride All
# # 프록시 서버 지시자. 프록시 서버 기능을 작동시키려면 다음 행의 # 주석을 해제시켜준다. #
ProxyRequests On #
Order deny,allow Deny from all Allow from all
# # HTTP/1.1 "Via:" 헤더를 처리할 것인지 여부를 결정한다. # ("Full"은 서버 버전을 포함하고 "Block"은 나가는 모든 자료에서 # Via: 헤더를 제거한다.) # Off | On | Full | Block 중 하나의 값을 지정한다. # ProxyVia On
# # 캐쉬 기능도 사용하기 위해서는 다음 행의 주석을 풀어준다: # (CacheRoot가 없으면 캐쉬하지 않음) # CacheRoot "/home/httpd/proxy" CacheSize 5 CacheGcInterval 4 CacheMaxExpire 24 CacheLastModifiedFactor 0.1 CacheDefaultExpire 1 #NoCache a_domain.com another_domain.edu joes.garage_sale.com
# # 프록시 설정 끝
### 섹션 3: 가상 호스트 # # VirtualHost: 여러분의 리눅스 박스에 여러 개의 도메인/호스트이름을 # 관리하고 싶다면 각각에 대하여 VirtualHost 컨테이너를 설정한다. # 가상 호스트를 설정하기에 앞서 자세한 설명을 # 에 들러 읽어보기 바란다. # 가상 호스트 설정 내용을 점검해보기 위해서는 아파치를 실행할 때 # 명령행 옵션으로 '-S'를 사용한다.
# # 이름 기반의 가상 호스트를 사용하려면 사용할 IP 주소 (최소 1 개, # 그리고 포트 번호)를 정의해주어야 한다. # #NameVirtualHost 12.34.56.78:80 #NameVirtualHost 12.34.56.78
# # 가상 호스트 예제: # 거의 모든 아파치 지시자가 VirtualHost 컨테이너에 올 수 있다. # # # ServerAdmin webmaster at host.some_domain.com # DocumentRoot /www/docs/host.some_domain.com # ServerName host.some_domain.com # ErrorLog logs/host.some_domain.com-error_log # CustomLog logs/host.some_domain.com-access_log common #
Get the latest iPhone SDK from Apple's iPhone Dev Center. The standard SDK download will include XCode and all the other development tools that we require. Note: You need at least iPhone SDK 3.2 if you want to develop for both the iPhone and the iPad.
For Android App Development
Install the Android SDK. When running the Android SDK setup program (called the "Android SDK and AVD Manager"), be sure to install "SDK Platform Android 1.6, API 4". You may also install more recent platforms (such as 2.1), but 1.6 is an absolute requirement for Titanium. Also install the "Google APIs" package(s) so that you can run the KitchenSink (our sample application that shows off Titanium functionality) and use the Google Maps API.
Install the latest Sun/Oracle Java Development Kit. JDK 6 (aka Java 1.6) is the minimum requirement for Titanium. On Windows, please set a JAVA_HOME environment variable to point to your JDK installation, or change your PATH to include a directory that includes java.exe, javac.exe, and jarsigner.exe.
Download and Install
After installing Titanium Developer, you should start the Titanium Developer product and see the following welcome screen:
If you already have an existing Appcelerator Network login, you can use those credentials to login. If not, you'll need to create an Appcelerator Network login. These credentials will give you access to a number of resources like Developer Center (this site) as well as access to cloud services like analytics.
Initial Project
Once you're logged in, you'll be able to create your first mobile project. Click the "New Project" button, select "Mobile" from the Project type drop down and you should see the following:
When you first enter the screen, the system will first check and make sure you have at least one mobile platform available before continuing. For Android, if you don't have the Android SDK on your PATH or it cannot be located, Developer will ask you for the installation location. Also, make sure that you have your Java SDK on your PATH environment as well.
Project fields
Name - the name of your project or application.
App Id - this must be a unique ID for your project. This is usually a namespace URL such as com.yourcompany.name. For iPhone, this must also match your iPhone provisioning id.
Directory - this is the directory (top level) to install your project. The full path to your project is directory/project_name.
Company/Personal URL - this is your URL
Titanium SDK version - the version of the Titanium Mobile SDK to use. This provides you will the ability to use different versions of the SDK for different applications.
Once you've filled out the required fields, you will be able to press the Create Project button to continue. Developer will create all the necessary files for your project for the available mobile platforms detected.
Verify the Sample Project
After you've created your new project, you should verify that everything is working. Click the Test & Package button in the middle of the project screen and you should see the following:
Verify for iPhone (if installed)
Click the tab that is labeled Run Emulator and then click the Launch button. After a few seconds, it will compile your application and launch it on the iPhone simulator and you should see:
Verify for Android (if installed)
Click the tab that is labeled 'Run Android Emulatorand then click theLaunch App` button. The Android emulator takes a considerable more time to start than the iPhone emulator. It generally takes 2-3 minutes to start the Android Emulator environment. However, once started, you can re-launch apps without having to restart the emulator (as long as you don't stop it).
What next?
Now, you're ready to start looking at code. Let's look at your application project.
There are a number of files and important folders in your mobile project. Here's the main files:
LICENSE - this file just describes the Appcelerator license. This is for your reference and not included in your application.
LICENSE.txt - this is your end-user application license. This is not currently used for mobile project but will be used in the future.
README - this file just describes the project and is not included in your application.
tiapp.xml - this is the main application descriptor file and describes details about your application and is used by the packager and the runtime.
manifest - this file is used by the packager and generally does not need to be modified.
build - this directory is where phone-specific project files and resources are kept. This folder is used by the packager and by developer for building, compiling and creating your native distributions. Generally, files in this folder should not be modified as this files are changed on demand by Titanium as your application changes. Use caution when touching any files or folders in these directories as it may render your application unusable.
Resources - this folder is very important and contains all your application files such as your JavaScript, HTML, images, etc. This is the main folder you will use to include resources for your application. All files included in this folder are packaged and available to your application.
Special resources per platform
There are a few specific folders under Resources that are special based on the final application package. Underneath the Resources folder is aniphone and android folder (dependent on which platforms you're using). All files placed under these folders will only be available on the platform by name. The files in these folders will take precedence (and will be merged) over files in the root Resources directory.
For example:
If you have a file named foo.png in the root folder and a file named foo.png under Resources/iphone - when Titanium compiles the application for iphone, you will have one file named foo.png which will be the file under the Resources/iphone directory. Directories are preserved during merging. This capability gives you more fine grain control over resources per platform in cases where you need to override or provide specific resources for a given platform. When you reference a file from your application, you should not include the platform in the name. For example, you would reference foo.png instead of iphone/foo.png since the files are merged into the base directory when packaged.
Default splash screen
To specify a default splash screen that is displayed as your application is loading, you need to replace the file named Default.png. For iPhone, you should take care to design a splash screen that will allow the spinner indicator to display near the center of the screen while loading.
Application icon
The application icon (what's shown on the phone screen) is controlled by the <icon> entry in the tiapp.xml file. The file is relative to theResources directory. You can specify a different icon for Android and iPhone by naming the file the same but including a different version in the respective platform folder under Resources.
Application Configuration
Most of the application configuration can be configured through Titanium Developer. However, there are a few application specific settings you'll need to edit directly in tiapp.xml.
iPhone specific configuration
There are a few additional iPhone specific configurations that control features or capabilities only available on iPhone.
persistent-wifi - this tag at the root level named <persistent-wifi> will tell iPhone that your application requires a persistent wifi connection and to not turn off the wifi after a brief period of inactivity. This defaults to false.
prerendered-icon - this tag at the root level named <prerendered-icon> will tell iPhone not to apply an additional gloss over your application icon. This is useful if you have a pre-rendered gloss that has been applied. This defaults to false.
Imagine you’re Paul Revere, riding from
Boston to Lexington to warn citizens that the redcoats were coming. He
may not be as fast as computer networks today, but Paul Revere was
essentially acting much like a broadcast would- he was relaying his
message to the entire town of Lexington.
A broadcast, in particular, is a simple message
that is sent to all clients on a local area network. But just exactly
what enables a network to broadcast a message to every single client on
the network?
What is a Broadcast Address?
A broadcast address is an address used to indicate that information
being sent out should be delivered to every client on the local area
network. These addresses are always the highest number possible in a
particular network address or subnet. We’ll cover subnets later, for now
let’s take a closer look at the most common broadcast address: Data
Link Layer broadcasts.
Broadcasts on the Data Link Layer correspond to MAC
addresses. MAC address broadcasts are generally the easiest to
understand, since they aren’t affiliated with IP addresses or
subnetting. In fact, all you really need to remember is
FF:FF:FF:FF:FF:FF. Whereas this MAC address would normally be comprised
of different hexadecimal values, it is instead simply all F’s. (As we
know, each F stands for the highest number in hexadecimal: 15)
When a MAC address broadcast is sent out, each
network interface card on the local area network will see the broadcast
address and automatically pass the information up to the upper layers of
the OSI model. So far it’s simple- right? Now let’s get back to the
subnetting and IP address topics that are present on the Network Layer.
How IP Broadcasts are Sent via the Network Layer
Remember how we stated that broadcast addresses are
always the highest-most number in an address range? IP broadcasts are
no exception! On a network that isn’t subnetted, we can simply place 1’s
in place for each bit in the host portion. The result: our very own
broadcast address!
Things are still fairly simple: simply replace each
host portion with the highest number you can create with 8 bits: 255.
Notice that the network portions do not change- just the host portions.
Sadly, this is where things start to get a little
trickier: we need to find the broadcast address of a subnetted network.
How to Find the Broadcast Address of a Subnetted Network
We need two things to find the broadcast address of
a subnetted network: an IP address, and the subnet mask. The process is
simple: find the inverse of the subnet mask. Then take the result, and
logically OR it with the IP address to get the broadcast address.
Of course, we can convert the above binary result
to decimal and get the broadcast address of 192.168.16.31. If you aren’t
familiar with the OR process, it’s rather simple. If there is a 1 in
either the IP or subnet field, then the result will always be a 1.
(Otherwise, the result is 0)
Now we know how to find the broadcast address and
how it works- but what is it used for?
What are Broadcast Addresses used for?
Broadcasts are generally used for several reasons:
Address Resolution Protocol (ARP) uses broadcasts to map physical
addresses to logical addresses. To build the table of hosts, a device
needs to send a broadcast to every other device on the network to
essentially find out who is where.
Several types of network protocols and services use broadcasts in
the same way. Dynamic Host Configuration Protocol (DHCP), for instance,
requires that broadcasts be used to dynamically assign an IP address to
computers on a network.
Routing protocols such as Routing Information Protocol (RIP) use
broadcasts to send out “advertisements.” This advertisement is used by
routers to map out the topology of a network, so that data can be routed
to the appropriate place accordingly. (Interesting enough, this
protocol will attempt to find the fasted route through a network to a
destination, based on how many “hops” it takes to get from the sender to
the receiver.)
Final Points of Interest on Broadcasts
Keep in mind that broadcasts will travel to every
single client on a network- at least, until a router is encountered. A
router is the only device that can separate a broadcast domain.
Logically, this is mandatory for the internet to exist. What do you
think would happen if broadcasts were being sent from network to
network- all over the internet? (Hint: no more Internet.)
Also make note that broadcast addresses should
never be used as host addresses. This can be confused in subnetting,
where it isn’t always clear where the host portion starts and ends. The
broadcast address is reserved as the highest value- and likewise, no IP
address should use a broadcast address or problems will arise.
초보자를 위한 유닉스 팁과 기교, Part 3: 필터와 정규 표현식 (IBM기사)
grep, sed, awk 등과 같은 유닉스 명령행 필터는 강력한 기능을 자랑한다. 이런 필터가 제공하는 기능을 확실하게 활용하려면 정규 표현식을 제대로 알아야 한다. 이 튜토리얼은 초보자에게 각 유틸리티가 제공하는 기능과 정규 표현식으로 텍스트를 조작하는 방법을 소개한다. 간단한 예제로 grep을 익힌 후 실제 예제로 sed와 awk를 익힌다.
The basic idea of a message queue is a simple one.
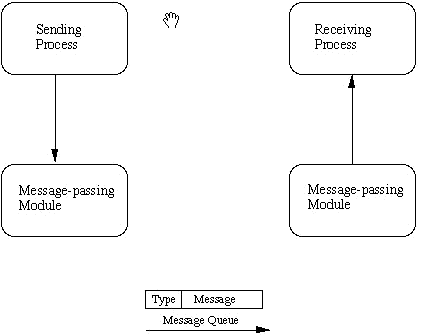
Two (or more) processes can exchange information via access to a common system message queue. The sending process places via some (OS) message-passing module a message onto a queue which can be read by another process (Figure 24.1). Each message is given an identification or type so that processes can select the appropriate message. Process must share a common key in order to gain access to the queue in the first place (subject to other permissions -- see below).
Fig. 24.1 Basic Message Passing IPC messaging lets processes send and receive messages, and queue messages for processing in an arbitrary order. Unlike the file byte-stream data flow of pipes, each IPC message has an explicit length. Messages can be assigned a specific type. Because of this, a server process can direct message traffic between clients on its queue by using the client process PID as the message type. For single-message transactions, multiple server processes can work in parallel on transactions sent to a shared message queue.
Before a process can send or receive a message, the queue must be initialized (through the msgget function see below) Operations to send and receive messages are performed by the msgsnd() and msgrcv() functions, respectively.
When a message is sent, its text is copied to the message queue. The msgsnd() and msgrcv() functions can be performed as either blocking or non-blocking operations. Non-blocking operations allow for asynchronous message transfer -- the process is not suspended as a result of sending or receiving a message. In blocking or synchronous message passing the sending process cannot continue until the message has been transferred or has even been acknowledged by a receiver. IPC signal and other mechanisms can be employed to implement such transfer. A blocked message operation remains suspended until one of the following three conditions occurs:
The msgget() function initializes a new message queue:
int msgget(key_t key, int msgflg)
It can also return the message queue ID (msqid) of the queue corresponding to the key argument. The value passed as the msgflg argument must be an octal integer with settings for the queue's permissions and control flags.
The following code illustrates the msgget() function.
#include <sys/ipc.h>; #include <sys/msg.h>; ... key_t key; /* key to be passed to msgget() */ int msgflg /* msgflg to be passed to msgget() */ int msqid; /* return value from msgget() */ ...key = ...msgflg = ...if ((msqid = msgget(key, msgflg)) == –1) { perror("msgget: msgget failed"); exit(1); } else (void) fprintf(stderr, “msgget succeeded");...
Processes requesting access to an IPC facility must be able to identify it. To do this, functions that initialize or provide access to an IPC facility use a key_t key argument. (key_t is essentially an int type defined in <sys/types.h>
The key is an arbitrary value or one that can be derived from a common seed at run time. One way is with ftok() , which converts a filename to a key value that is unique within the system. Functions that initialize or get access to messages (also semaphores or shared memory see later) return an ID number of type int. IPC functions that perform read, write, and control operations use this ID. If the key argument is specified as IPC_PRIVATE, the call initializes a new instance of an IPC facility that is private to the creating process. When the IPC_CREAT flag is supplied in the flags argument appropriate to the call, the function tries to create the facility if it does not exist already. When called with both the IPC_CREAT and IPC_EXCL flags, the function fails if the facility already exists. This can be useful when more than one process might attempt to initialize the facility. One such case might involve several server processes having access to the same facility. If they all attempt to create the facility with IPC_EXCL in effect, only the first attempt succeeds. If neither of these flags is given and the facility already exists, the functions to get access simply return the ID of the facility. If IPC_CREAT is omitted and the facility is not already initialized, the calls fail. These control flags are combined, using logical (bitwise) OR, with the octal permission modes to form the flags argument. For example, the statement below initializes a new message queue if the queue does not exist.
The msgctl() function alters the permissions and other characteristics of a message queue. The owner or creator of a queue can change its ownership or permissions using msgctl() Also, any process with permission to do so can use msgctl() for control operations.
The msgctl() function is prototypes as follows:
int msgctl(int msqid, int cmd, struct msqid_ds *buf )
The msqid argument must be the ID of an existing message queue. The cmd argument is one of:
IPC_STAT
-- Place information about the status of the queue in the data structure pointed to by buf. The process must have read permission for this call to succeed.
IPC_SET
-- Set the owner's user and group ID, the permissions, and the size (in number of bytes) of the message queue. A process must have the effective user ID of the owner, creator, or superuser for this call to succeed.
IPC_RMID
-- Remove the message queue specified by the msqid argument.
The following code illustrates the msgctl() function with all its various flags:
The msgsnd() and msgrcv() functions send and receive messages, respectively:
int msgsnd(int msqid, const void *msgp, size_t msgsz, int msgflg);int msgrcv(int msqid, void *msgp, size_t msgsz, long msgtyp, int msgflg);
The msqid argument must be the ID of an existing message queue. The msgp argument is a pointer to a structure that contains the type of the message and its text. The structure below is an example of what this user-defined buffer might look like:
struct mymsg { long mtype; /* message type */ char mtext[MSGSZ]; /* message text of length MSGSZ */}
The msgsz argument specifies the length of the message in bytes.
The structure member msgtype is the received message's type as specified by the sending process.
The argument msgflg specifies the action to be taken if one or more of the following are true:
The number of bytes already on the queue is equal to msg_qbytes.
The total number of messages on all queues system-wide is equal to the system-imposed limit.
These actions are as follows:
If (msgflg & IPC_NOWAIT) is non-zero, the message will not be sent and the calling process will return immediately.
If (msgflg & IPC_NOWAIT) is 0, the calling process will suspend execution until one of the following occurs:
The condition responsible for the suspension no longer exists, in which case the message is sent.
The message queue identifier msqid is removed from the system; when this occurs, errno is set equal to EIDRM and -1 is returned.
The calling process receives a signal that is to be caught; in this case the message is not sent and the calling process resumes execution.
Upon successful completion, the following actions are taken with respect to the data structure associated with msqid:
msg_qnum is incremented by 1.
msg_lspid is set equal to the process ID of the calling process.
msg_stime is set equal to the current time.
The following code illustrates msgsnd() and msgrcv():
#include <sys/types.h> #include <sys/ipc.h>#include <sys/msg.h>...int msgflg; /* message flags for the operation */struct msgbuf *msgp; /* pointer to the message buffer */int msgsz; /* message size */long msgtyp; /* desired message type */int msqid /* message queue ID to be used */...msgp = (struct msgbuf *)malloc((unsigned)(sizeof(struct msgbuf)- sizeof msgp->mtext + maxmsgsz));if (msgp == NULL) {(void) fprintf(stderr, "msgop: %s %d byte messages.\n","could not allocate message buffer for", maxmsgsz);exit(1);...msgsz = ...msgflg = ...if (msgsnd(msqid, msgp, msgsz, msgflg) == -1)perror("msgop: msgsnd failed");...msgsz = ...msgtyp = first_on_queue;msgflg = ...if (rtrn = msgrcv(msqid, msgp, msgsz, msgtyp, msgflg) == -1)perror("msgop: msgrcv failed");...
The full code listing for message_send.c's companion process, message_rec.c is as follows:
#include <sys/types.h>#include <sys/ipc.h>#include <sys/msg.h>#include <stdio.h>#define MSGSZ 128/* * Declare the message structure. */typedef struct msgbuf { long mtype; char mtext[MSGSZ];} message_buf;main(){ int msqid; key_t key; message_buf rbuf; /* * Get the message queue id for the * "name" 1234, which was created by * the server. */ key = 1234; if ((msqid = msgget(key, 0666)) < 0) { perror("msgget"); exit(1); } /* * Receive an answer of message type 1. */ if (msgrcv(msqid, &rbuf, MSGSZ, 1, 0) < 0) { perror("msgrcv"); exit(1); } /* * Print the answer. */ printf("%s\n", rbuf.mtext); exit(0);}
The essential points to note here are:
The Message queue is opened with msgget (message flag 0666) and the samekey as message_send.c.
A message of the same type 1 is received from the queue with the message ``Did you get this?'' stored in rbuf.mtext.
The following suite of programs can be used to investigate interactively a variety of massage passing ideas (see exercises below).
The message queue must be initialised with the msgget.c program. The effects of controlling the queue and sending and receiving messages can be investigated with msgctl.c and msgop.c respectively.
/* * msgctl.c: Illustrate the msgctl() function. * * This is a simple exerciser of the msgctl() function. It allows * you to perform one control operation on one message queue. It * gives up immediately if any control operation fails, so becareful * not to set permissions to preclude read permission; you won'tbe * able to reset the permissions with this code if you do. */#include <stdio.h>#include <sys/types.h>#include <sys/ipc.h>#include <sys/msg.h>#include <time.h>static void do_msgctl();extern void exit();extern void perror();static char warning_message[] = "If you remove read permissionfor \ yourself, this program will fail frequently!";main(){ struct msqid_ds buf; /* queue descriptor buffer for IPC_STAT and IP_SET commands */ int cmd, /* command to be given to msgctl() */ msqid; /* queue ID to be given to msgctl() */ (void fprintf(stderr, "All numeric input is expected to follow C conventions:\n"); (void) fprintf(stderr, "\t0x... is interpreted as hexadecimal,\n"); (void) fprintf(stderr, "\t0... is interpreted as octal,\n"); (void) fprintf(stderr, "\totherwise, decimal.\n"); /* Get the msqid and cmd arguments for the msgctl() call. */ (void) fprintf(stderr, "Please enter arguments for msgctls() as requested."); (void) fprintf(stderr, "\nEnter the msqid: "); (void) scanf("%i", &msqid); (void) fprintf(stderr, "\tIPC_RMID = %d\n", IPC_RMID); (void) fprintf(stderr, "\tIPC_SET = %d\n", IPC_SET); (void) fprintf(stderr, "\tIPC_STAT = %d\n", IPC_STAT); (void) fprintf(stderr, "\nEnter the value for the command: "); (void) scanf("%i", &cmd); switch (cmd) { case IPC_SET: /* Modify settings in the message queue control structure.*/ (void) fprintf(stderr, "Before IPC_SET, get currentvalues:"); /* fall through to IPC_STAT processing */ case IPC_STAT: /* Get a copy of the current message queue control * structure and show it to the user. */ do_msgctl(msqid, IPC_STAT, &buf); (void) fprintf(stderr, ] "msg_perm.uid = %d\n", buf.msg_perm.uid); (void) fprintf(stderr, "msg_perm.gid = %d\n", buf.msg_perm.gid); (void) fprintf(stderr, "msg_perm.cuid = %d\n", buf.msg_perm.cuid); (void) fprintf(stderr, "msg_perm.cgid = %d\n", buf.msg_perm.cgid); (void) fprintf(stderr, "msg_perm.mode = %#o, ", buf.msg_perm.mode); (void) fprintf(stderr, "access permissions = %#o\n", buf.msg_perm.mode & 0777); (void) fprintf(stderr, "msg_cbytes = %d\n", buf.msg_cbytes); (void) fprintf(stderr, "msg_qbytes = %d\n", buf.msg_qbytes); (void) fprintf(stderr, "msg_qnum = %d\n", buf.msg_qnum); (void) fprintf(stderr, "msg_lspid = %d\n", buf.msg_lspid); (void) fprintf(stderr, "msg_lrpid = %d\n", buf.msg_lrpid); (void) fprintf(stderr, "msg_stime = %s", buf.msg_stime ? ctime(&buf.msg_stime) : "Not Set\n"); (void) fprintf(stderr, "msg_rtime = %s", buf.msg_rtime ? ctime(&buf.msg_rtime) : "Not Set\n"); (void) fprintf(stderr, "msg_ctime = %s", ctime(&buf.msg_ctime)); if (cmd == IPC_STAT) break; /* Now continue with IPC_SET. */ (void) fprintf(stderr, "Enter msg_perm.uid: "); (void) scanf ("%hi", &buf.msg_perm.uid); (void) fprintf(stderr, "Enter msg_perm.gid: "); (void) scanf("%hi", &buf.msg_perm.gid); (void) fprintf(stderr, "%s\n", warning_message); (void) fprintf(stderr, "Enter msg_perm.mode: "); (void) scanf("%hi", &buf.msg_perm.mode); (void) fprintf(stderr, "Enter msg_qbytes: "); (void) scanf("%hi", &buf.msg_qbytes); do_msgctl(msqid, IPC_SET, &buf); break; case IPC_RMID: default: /* Remove the message queue or try an unknown command. */ do_msgctl(msqid, cmd, (struct msqid_ds *)NULL); break; } exit(0);}/* * Print indication of arguments being passed to msgctl(), call * msgctl(), and report the results. If msgctl() fails, do not * return; this example doesn't deal with errors, it just reports * them. */static voiddo_msgctl(msqid, cmd, buf)struct msqid_ds *buf; /* pointer to queue descriptor buffer */int cmd, /* command code */ msqid; /* queue ID */{ register int rtrn; /* hold area for return value from msgctl()*/ (void) fprintf(stderr, "\nmsgctl: Calling msgctl(%d, %d,%s)\n", msqid, cmd, buf ? "&buf" : "(struct msqid_ds *)NULL"); rtrn = msgctl(msqid, cmd, buf); if (rtrn == -1) { perror("msgctl: msgctl failed"); exit(1); } else { (void) fprintf(stderr, "msgctl: msgctl returned %d\n", rtrn); }}
/* * msgop.c: Illustrate the msgsnd() and msgrcv() functions. * * This is a simple exerciser of the message send and receive * routines. It allows the user to attempt to send and receive asmany * messages as wanted to or from one message queue. */#include <stdio.h>#include <sys/types.h>#include <sys/ipc.h>#include <sys/msg.h>static int ask();extern void exit();extern char *malloc();extern void perror();char first_on_queue[] = "-> first message on queue", full_buf[] = "Message buffer overflow. Extra message text\ discarded.";main(){ register int c; /* message text input */ int choice; /* user's selected operation code */ register int i; /* loop control for mtext */ int msgflg; /* message flags for the operation */ struct msgbuf *msgp; /* pointer to the message buffer */ int msgsz; /* message size */ long msgtyp; /* desired message type */ int msqid, /* message queue ID to be used */ maxmsgsz, /* size of allocated message buffer */ rtrn; /* return value from msgrcv or msgsnd */ (void) fprintf(stderr, "All numeric input is expected to follow C conventions:\n"); (void) fprintf(stderr, "\t0x... is interpreted as hexadecimal,\n"); (void) fprintf(stderr, "\t0... is interpreted as octal,\n"); (void) fprintf(stderr, "\totherwise, decimal.\n"); /* Get the message queue ID and set up the message buffer. */ (void) fprintf(stderr, "Enter msqid: "); (void) scanf("%i", &msqid); /* * Note that <sys/msg.h> includes a definition of structmsgbuf * with the mtext field defined as: * char mtext[1]; * therefore, this definition is only a template, not astructure * definition that you can use directly, unless you want onlyto * send and receive messages of 0 or 1 byte. To handle this, * malloc an area big enough to contain the template - the size * of the mtext template field + the size of the mtext field * wanted. Then you can use the pointer returned by malloc as a * struct msgbuf with an mtext field of the size you want. Note * also that sizeof msgp->mtext is valid even though msgpisn't * pointing to anything yet. Sizeof doesn't dereference msgp,but * uses its type to figure out what you are asking about. */ (void) fprintf(stderr, "Enter the message buffer size you want:"); (void) scanf("%i", &maxmsgsz); if (maxmsgsz < 0) { (void) fprintf(stderr, "msgop: %s\n", "The message buffer size must be >= 0."); exit(1); } msgp = (struct msgbuf *)malloc((unsigned)(sizeof(structmsgbuf) - sizeof msgp->mtext + maxmsgsz)); if (msgp == NULL) { (void) fprintf(stderr, "msgop: %s %d byte messages.\n", "could not allocate message buffer for", maxmsgsz); exit(1); } /* Loop through message operations until the user is ready to quit. */ while (choice = ask()) { switch (choice) { case 1: /* msgsnd() requested: Get the arguments, make the call, and report the results. */ (void) fprintf(stderr, "Valid msgsnd message %s\n", "types are positive integers."); (void) fprintf(stderr, "Enter msgp->mtype: "); (void) scanf("%li", &msgp->mtype); if (maxmsgsz) { /* Since you've been using scanf, you need the loop below to throw away the rest of the input on the line after the entered mtype before you start reading the mtext. */ while ((c = getchar()) != '\n' && c != EOF); (void) fprintf(stderr, "Enter a %s:\n", "one line message"); for (i = 0; ((c = getchar()) != '\n'); i++) { if (i >= maxmsgsz) { (void) fprintf(stderr, "\n%s\n", full_buf); while ((c = getchar()) != '\n'); break; } msgp->mtext[i] = c; } msgsz = i; } else msgsz = 0; (void) fprintf(stderr,"\nMeaningful msgsnd flag is:\n"); (void) fprintf(stderr, "\tIPC_NOWAIT =\t%#8.8o\n", IPC_NOWAIT); (void) fprintf(stderr, "Enter msgflg: "); (void) scanf("%i", &msgflg); (void) fprintf(stderr, "%s(%d, msgp, %d, %#o)\n", "msgop: Calling msgsnd", msqid, msgsz, msgflg); (void) fprintf(stderr, "msgp->mtype = %ld\n", msgp->mtype); (void) fprintf(stderr, "msgp->mtext = \""); for (i = 0; i < msgsz; i++) (void) fputc(msgp->mtext[i], stderr); (void) fprintf(stderr, "\"\n"); rtrn = msgsnd(msqid, msgp, msgsz, msgflg); if (rtrn == -1) perror("msgop: msgsnd failed"); else (void) fprintf(stderr, "msgop: msgsnd returned %d\n", rtrn); break; case 2: /* msgrcv() requested: Get the arguments, make the call, and report the results. */ for (msgsz = -1; msgsz < 0 || msgsz > maxmsgsz; (void) scanf("%i", &msgsz)) (void) fprintf(stderr, "%s (0 <= msgsz <= %d): ", "Enter msgsz", maxmsgsz); (void) fprintf(stderr, "msgtyp meanings:\n"); (void) fprintf(stderr, "\t 0 %s\n", first_on_queue); (void) fprintf(stderr, "\t>0 %s of given type\n", first_on_queue); (void) fprintf(stderr, "\t<0 %s with type <= |msgtyp|\n", first_on_queue); (void) fprintf(stderr, "Enter msgtyp: "); (void) scanf("%li", &msgtyp); (void) fprintf(stderr, "Meaningful msgrcv flags are:\n"); (void) fprintf(stderr, "\tMSG_NOERROR =\t%#8.8o\n", MSG_NOERROR); (void) fprintf(stderr, "\tIPC_NOWAIT =\t%#8.8o\n", IPC_NOWAIT); (void) fprintf(stderr, "Enter msgflg: "); (void) scanf("%i", &msgflg); (void) fprintf(stderr, "%s(%d, msgp, %d, %ld, %#o);\n", "msgop: Calling msgrcv", msqid, msgsz, msgtyp, msgflg); rtrn = msgrcv(msqid, msgp, msgsz, msgtyp, msgflg); if (rtrn == -1) perror("msgop: msgrcv failed"); else { (void) fprintf(stderr, "msgop: %s %d\n", "msgrcv returned", rtrn); (void) fprintf(stderr, "msgp->mtype = %ld\n", msgp->mtype); (void) fprintf(stderr, "msgp->mtext is: \""); for (i = 0; i < rtrn; i++) (void) fputc(msgp->mtext[i], stderr); (void) fprintf(stderr, "\"\n"); } break; default: (void) fprintf(stderr, "msgop: operation unknown\n"); break; } } exit(0);}/* * Ask the user what to do next. Return the user's choice code. * Don't return until the user selects a valid choice. */staticask(){ int response; /* User's response. */ do { (void) fprintf(stderr, "Your options are:\n"); (void) fprintf(stderr, "\tExit =\t0 or Control-D\n"); (void) fprintf(stderr, "\tmsgsnd =\t1\n"); (void) fprintf(stderr, "\tmsgrcv =\t2\n"); (void) fprintf(stderr, "Enter your choice: "); /* Preset response so "^D" will be interpreted as exit. */ response = 0; (void) scanf("%i", &response); } while (response < 0 || response > 2); return(response);}
Write a 2 programs that will both send and messages and construct the following dialog between them
(Process 1) Sends the message "Are you hearing me?"
(Process 2) Receives the message and replies "Loud and Clear".
(Process 1) Receives the reply and then says "I can hear you too".
Exercise 12756
Compile the programs msgget.c, msgctl.c and msgop.c and then
investigate and understand fully the operations of the flags (access, creation etc. permissions) you can set interactively in the programs.
Use the programs to:
Send and receive messages of two different message types.
Place several messages on the queue and inquire about the state of the queue with msgctl.c. Add/delete a few messages (using msgop.c and perform the inquiry once more.
Use msgctl.c to alter a message on the queue.
Use msgctl.c to delete a message from the queue.
Exercise 12757
Write a server program and two client programs so that the server can communicate privately to each client individually via a single message queue.
Exercise 12758
Implement a blocked or synchronous method of message passing using signal interrupts.